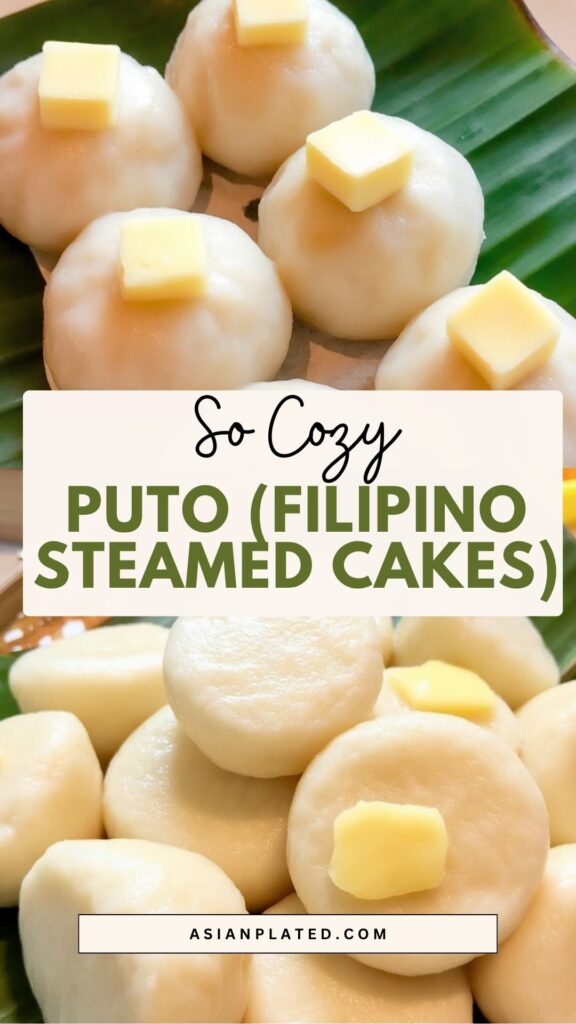
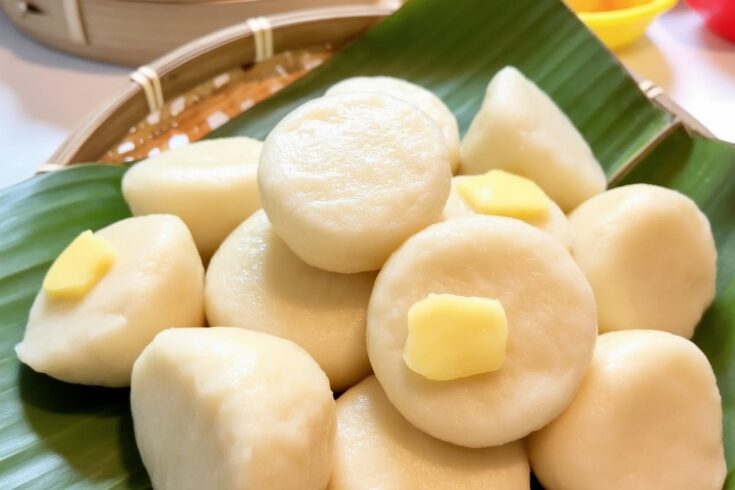
Is there anything more welcoming at a Filipino gathering than a tray of puto, those adorably plump steamed cakes? In my home, they’re always nestled among savory dishes at family parties—perfect for snacking or for soaking up rich, saucy favorites. I like to think of puto as the multi-talented team player of Filipino cuisine: sweet enough to be a treat, yet just plain enough to complement whatever main dish is on the table.
")
What Makes This Puto Recipe So Cozy
The heart of this recipe is all about approachability and comfort. It’s quick, the ingredients are simple, and you don’t need a shelf stocked with specialty flours—just regular all-purpose. When flour shortages hit a few years ago, this tweak became a lifesaver in my kitchen, echoing how my mom has always made her puto when rice flour was hard to find. You’ll be amazed at how beautifully tender and fluffy these come out.
- Utterly Soft: The texture is pillowy, perfect for both nibbling on with coffee in the afternoon or pairing with a main meal.
- Familiar Ingredients: Eggs, milk, butter, flour—things you probably already have.
- Infinite Variety: Dress them up with cheese, flavor extracts, or keep them plain for maximum versatility.
Making Puto a Family Tradition
Puto is woven into my childhood memories. I remember dipping a piece into a hearty stew at a birthday party, at first puzzled why anyone would pair something gently sweet with something so savory. That first bite made everything click—the soft, mild cake soaking up the flavors, adding comfort to every spoonful.
You’ll also find that puto is perfect on its own, especially when served slightly warm with a cup of strong coffee or tea. We’ve even had it as a breakfast treat when rushing out on busy mornings.

Choosing and Using Puto Molds
If you grew up in a Filipino household, you probably saw all sorts of puto molds—colorful plastic cups that get reused from party to party, sometimes even passed down through the family. My kitchen drawer still has some well-loved aluminum molds my aunt gifted me, each one a little battered but still perfect.
Don’t have special molds? No problem. Muffin tins, mini tart pans, or even silicone cupcake molds work beautifully. Just keep your mold size similar (about 2-3 inches in diameter) for that classic puto shape and texture. If you decide to try making a big “cake” version, just remember to steam it longer and test with a toothpick before taking it out.
Ingredient Swaps and What Sets This Version Apart
The classic puto starts with rice flour and sometimes uses fermented batter, but this recipe uses good old all-purpose flour for ease (and honestly, for most pantries, this is a big plus).
- Eggs and Baking Powder: These guys make sure your puto rises high and stays beautifully airy.
- Milk and Powdered Milk: My family always adds a little powdered milk for extra richness—if you haven’t tried it before, it really does make a difference.
- Butter: For a gently sweet, lightly buttery flavor.
- Cheese: I grew up with a slice of processed cheese or cheddar on top for that hint of saltiness. If you love experimenting, try gouda or leave it off altogether for a classic plain puto.
- Flavor Options: When I want to get fancy, I’ll add vanilla, ube, or pandan extract for a pop of color and subtle aroma. Swirls of ube halaya take things to a whole other level for celebrations.
Substitution Notes
- Oil works instead of butter if you’re in a pinch, but you’ll notice a slightly different crumb.
- Feel free to use evaporated milk for a richer taste—just expect a denser, possibly browner finish from the extra sugar content.
- Flour swaps (like rice or self-rising) change the texture, so play around to see what you like best.
My Go-To Instructions for Puto Success
- Start With Your Wet Mix: In one bowl, whisk together eggs, milk, and melted butter until smooth.
- Add the Dry Ingredients: Sift together flour, sugar, powdered milk, and baking powder—this step really helps keep your cakes light. Gently fold them into your wet mixture. It’s okay if some lumps remain; it actually helps keep things fluffy.
- Fill the Molds: Spoon the batter into greased molds, filling each about three-quarters full. Leave a little room for rising.
- Steaming Time: Set up your steamer and bring water to a medium boil. Place the molds in, cover, and steam for about 15 minutes. If you’re adding cheese, tuck a slice on top after 13 minutes and finish steaming.
- Check for Doneness: A toothpick inserted should come out mostly clean, with a few soft crumbs.
- Let Cool Slightly: Gently remove from molds. I love eating them warm, but room temperature is just as tasty.
Lessons Learned and Helpful Hints
- Don’t Over Mix: The more you mix, the tougher your puto gets. Just combine until you don’t see big streaks of flour.
- Mind Your Steam: Maintain a steady (not rolling) boil so the puto cooks evenly and doesn’t collapse. If too much water drips onto the cakes from the lid, cover the molds loosely with a bit of cloth or foil.
- Grease Those Molds: Saves you from prying stuck cakes out with a spoon. Trust me, I’ve learned this one the hard way.
- Custom Flavors: If you want to try pandan, ube, or vanilla, start with a teaspoon and adjust to taste.
How I Serve Puto at Home
- With stews (dinuguan is the classic but any saucy dish works)
- As a snack with coffee or hot chocolate—in my case, there’s always a batch in the fridge during rainy weeks
- As a sweet dessert, topped with cheese, salted egg, or drizzled with a little coconut jam for a special touch
Keeping Puto Fresh
- Refrigerate: Store in an airtight container or well-wrapped in plastic. They stay soft for up to four days; just reheat gently with a quick steam or a short zap in the microwave.
- Freeze for Later: These freeze beautifully for up to three months. Defrost in the fridge, then reheat gently. Great for unexpected guests or sudden cravings.
- Batch Prep: The batter can be made the night before, but steam it within a day for the best fluff. Fresh steaming always makes for the most cloud-like texture.
Your Puto Questions Answered
Can I use bigger or different molds?
Yes, just allow extra steaming time and check doneness with a toothpick.
Can I make the batter ahead of time?
You can mix it a day before, but steam soon after so your cakes rise well (baking powder loses strength if it sits too long).
What if I want to bake, not steam?
You can try a water bath in the oven at 350°F, 10–12 minutes for small portions. Check with a toothpick for readiness.
Why didn’t my puto rise?
Old baking powder or low heat are often the cause. Use fresh leavening and keep the steam strong and steady.
Soft, fluffy, and always a crowd favorite, these Filipino steamed cakes are pure nostalgia for me. Give them a go, customize to your taste, and let them become a staple at your gatherings too. When you bite into that first warm piece, you’ll understand why puto is so beloved—simple, comforting, and always welcome on any table.
Puto (Filipino Steamed Cakes)
A fluffy, tender Filipino treat perfect for snacks or dessert.
Ingredients
- 2 large eggs
- 3/4 cup milk
- 1/4 cup unsalted butter, melted
- 1 1/2 cups all-purpose flour, spooned and leveled
- 1 cup granulated sugar
- 1/2 cup powdered milk
- 1 tablespoon baking powder
- Optional: quick-melt cheese (like Eden or Velveeta), sliced or cubed
Instructions
- In a mixing bowl, whisk together eggs, milk, and melted butter until combined and smooth.
- Sift in the flour along with sugar, powdered milk, and baking powder. Gently fold the mixture until just incorporated—some small lumps are fine, as overmixing can lead to denser puto.
- Fill your puto molds or mini muffin tins about three-quarters full to leave room for rising.
- Set your steamer to medium heat and steam the cakes for 15 minutes, or until they’ve puffed up and are cooked through.
- If you want that classic cheesy finish, add the cheese on top after 13 minutes of steaming, then continue steaming for the final 2 minutes until melted and gooey.
- Test doneness by inserting a toothpick in the center—it should come out clean or with a few moist crumbs. Let them cool briefly before removing from molds, and enjoy these soft delights warm.
Notes
- Cheese adds a lovely salty contrast; typical in Filipino kitchens are processed cheeses, but feel free to experiment with cheddar or gouda.
- Authentic puto molds are small, about 2 to 3 inches wide. If you don’t have these, mini muffin pans work just fine. Larger molds require longer steaming.
- Store leftover puto in an airtight container refrigerated for up to 4 days. Warm gently in a steamer or microwave. These freeze well for up to 3 months—just thaw and reheat before serving.
Nutrition Information:
Yield: 30 Serving Size: 1Amount Per Serving: Calories: 78Total Fat: 2gSaturated Fat: 1gTrans Fat: 0gUnsaturated Fat: 1gCholesterol: 18mgSodium: 69mgCarbohydrates: 13gFiber: 0gSugar: 8gProtein: 2g
Asianplated.com, occasionally offers nutritional information for recipes contained on this site. This information is provided as a courtesy and is an estimate only. This information comes from online calculators. Although allchickenrecipes.com attempts to provide accurate nutritional information, these figures are only estimates.
Try other Filipino recipes: