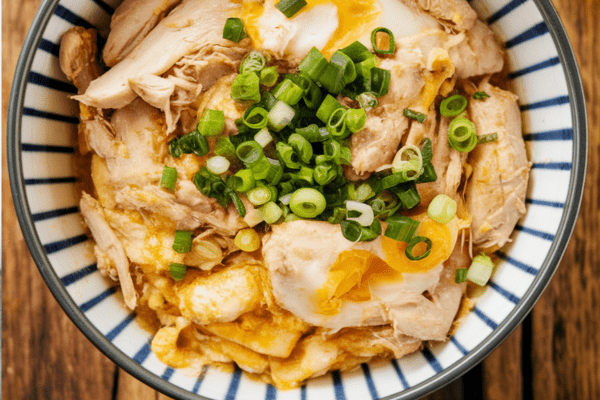
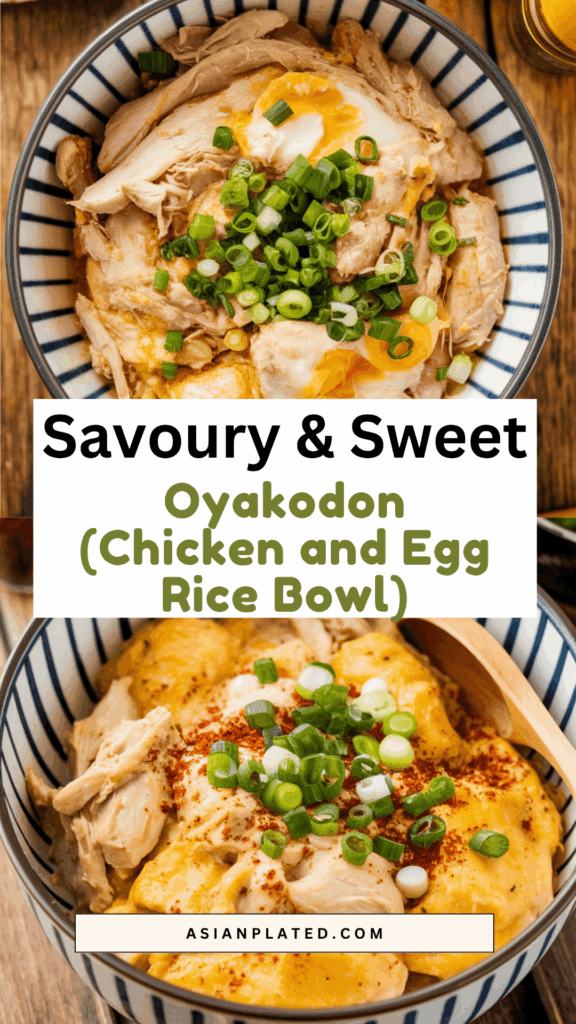
If you ask me about the meals I turn to when I want something warm, filling, and fuss-free, this chicken and egg rice bowl (Oyakodon) is right at the top. Imagine tender chicken, sweet onions, and soft-cooked egg, all simmered in a savory-sweet broth and spooned over a bowl of hot rice. It’s the kind of meal I make on busy weeknights when I want the family fed in under 30 minutes without sacrificing flavor.
")
It’s simple but deeply satisfying—exactly the kind of cooking that makes you feel at home.
What Makes This Rice Bowl Special
I love this dish because it’s pure comfort in a bowl. “Oyakodon” literally means “parent and child rice bowl” in Japanese—a little poetic nod to the use of both chicken and egg.
You get layers of flavor from the broth, with onions softening and sweetening as they cook. The egg binds everything together, creating this velvety topping that soaks right into the rice.
If you’ve ever had it at a small Japanese diner or lunch spot, you’ll know it’s classic fast-but-good food—like the Japanese answer to quick lunch bowls that fuel the day. But it’s also the kind of thing that families make at home all the time, and I think that’s what makes it so inviting.
Why This Is on Repeat in My Kitchen
Minimal dishes, one pan: I don’t know about you, but I love anything that doesn’t have me standing at the sink forever. This is a true one-pan, one-bowl dinner.
Quick to cook: Even when I’m tired or in a rush, this one always feels doable. About 30 minutes start to finish. I remember first making something like this in a school cooking class, and it’s been a lifesaver ever since.
Simple ingredients: Chicken, eggs, onion—things I usually have on hand. For the sauce, I keep soy sauce, mirin, and dashi powder in my pantry since I cook Japanese food often.
No added oil: Instead of frying, the chicken and onions simmer gently in broth. It keeps it light but flavorful.
Deeply comforting: Every bite is tender, savory, and a little sweet, with rice soaking up all that sauce. It’s warm, filling, and makes me feel like I’m eating something my grandmother would approve of.
Ingredients You’ll Need
- Chicken thighs: I always go with thighs—they’re juicier and don’t dry out. I’ve tried breasts, but they’re less forgiving if you’re not careful.
- Sake (optional): A little splash over the chicken can help remove any strong, raw smell.
- Onion: Brings sweetness and body to the sauce.
- Eggs: The star with the chicken. They create that signature silky layer.
- Seasonings: Soy sauce, mirin, sugar, and dashi stock. That dashi base is what makes it unmistakably Japanese.
- Steamed rice: Short-grain rice if you can, for the classic texture.
- Garnish: Thinly sliced green onions or mitsuba (a Japanese herb that’s a bit like parsley with a slight bitterness).
- Optional table spices: Shichimi togarashi or sansho pepper for a subtle kick.
Personal tip: If you’re just starting with Japanese cooking, don’t sweat it if you don’t have mitsuba or fancy seasonings. Even plain green onion does wonders.
How I Cook It at Home
- Prep everything first: Slice your onion and chicken, crack and separate your eggs so you can “cut” the whites a bit (more on that below).
- Cook the onions in broth: Let them soften in the sauce mixture. The kitchen will smell amazing.
- Add chicken: Simmer until it’s cooked through but tender.
- Add eggs in stages: I do this so some parts set more firmly and others stay creamy.
- Serve over hot rice: I love to see the sauce soak in as I spoon it over.
Let’s Talk About Dashi
If there’s one thing that gives this bowl its signature flavor, it’s dashi stock. It’s the backbone of so many Japanese dishes.
Making homemade dashi isn’t hard at all—kombu and bonito flakes in water for 30 minutes. Or use a dashi packet for convenience. Honestly, I often use the packet when I’m in a rush.
I’ll usually make about 4 cups of dashi in one go, using half a cup here and saving the rest for miso soup. It’s a great way to get a complete meal on the table without extra work.
My Cooking Tips from Experience
Slicing the Chicken Right
Japanese recipes often use a “sogigiri” diagonal cut. It helps the chicken cook evenly and soak up the sauce.
I’ve tested different chunk sizes, and around 2 cm (3/4 inch) pieces work best. Too big and they fall away from the egg and onion; too small and they overcook fast.
Don’t Fully Beat the Eggs
Here’s one of my favorite tricks: instead of beating eggs until smooth, I “cut” the whites a few times with chopsticks. It keeps the whites and yolks partially separated so you get a beautiful marbled look when it cooks.
It also changes the texture, so you get soft, silky ribbons of egg rather than a uniform scramble.
Cooking in Small Batches
If you’re cooking for four or six people, don’t crowd everything into one pan. I’ve tried it and ended up with a soupy mess. The sauce doesn’t reduce properly, and the flavors get diluted.
I usually do two servings at a time in a medium pan, or split it into two pans if I’m cooking for the whole family.
Keep It Uncovered
This was a revelation to me after experimenting both ways. Covering the pan traps steam, and the chicken can overcook before the sauce reduces.
Cooking uncovered means the excess liquid evaporates, intensifying the flavor and letting the chicken soak it up.
Small exception: If you really want the eggs firm all the way through, you can briefly cover it after adding the last bit of egg.
Add the Eggs in Two Steps
This is key for the right texture. I add about two-thirds of the egg mixture first so the whites get time to firm up. Then I pour the remaining third (with more yolk) for that luscious soft layer on top.
If your eggs are at room temperature, they’ll cook more evenly.
And a note on safety: In Japan, they often serve this with quite runny eggs since raw eggs are safe there. At home, I cook mine just a bit longer for peace of mind.
Cooking Gear – Does the Pan Matter?
In Japan, they use a special single-serving pan for oyakodon. It’s shallow and slope-sided, perfect for sliding the whole layer neatly over rice.
I don’t own one, so I usually use a small nonstick frying pan. The key is that it’s about the same diameter as your rice bowl so you can lift and slide without breaking it up too much.
If you’re cooking for more people, a wide shallow braiser works better than stacking it all in one crowded pan.
Serving and Eating
I always serve this over hot, freshly cooked short-grain rice. The rice soaks up every bit of that sweet-salty sauce.
A sprinkle of green onions adds freshness. If you want a little heat, shichimi togarashi is great.
It’s even better with a bowl of miso soup on the side. That’s how I often make it at home for a simple but satisfying dinner.
Storing and Reheating
If there are leftovers (rare in my house!), I keep them in an airtight container in the fridge for a day or two. Reheat gently in a pan with a splash of water or dashi to loosen the sauce.
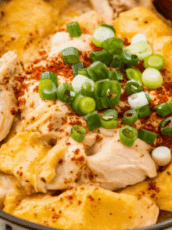
Oyakodon (Chicken and Egg Rice Bowl)
There’s something deeply comforting about a bowl of oyakodon — tender chicken, silky eggs, and sweet onions simmered in a savory-sweet sauce, all gently ladled over warm, fluffy rice.
Ingredients
- 3–4 large eggs, room temperature
- 10 oz boneless, skinless chicken thighs
- ½ medium onion
- 1 Tbsp sake (or dry sherry / rice wine)
- 2 servings cooked Japanese short-grain rice
- 4 sprigs mitsuba (or substitute with green onion)
- Shichimi togarashi (optional)
- Japanese sansho pepper (optional)
For the sauce:
- ½ cup dashi (or vegan dashi)
- 2 Tbsp soy sauce
- 2 Tbsp mirin
- 2 tsp sugar
Instructions
- Prep the Sauce: In a bowl or measuring cup, stir together the dashi, soy sauce, mirin, and sugar until well blended. Set aside.
- Prepare the Ingredients: Slice the onion into thin wedges. Cut the chicken into bite-sized pieces using a diagonal slicing method for even thickness. Marinate with sake for about 5 minutes. Chop the mitsuba or scallions into short segments. Crack the eggs into a bowl and gently break up the whites with chopsticks, taking care not to fully mix them. You're aiming for a marbled look.
- Cook the Chicken and Onion: In a medium frying pan (around 10 inches), arrange the sliced onions evenly. Pour in the sauce — it should just barely cover the onions. Turn the heat to medium and bring it to a gentle simmer. Lay the chicken pieces on top, spreading them evenly. Cook uncovered for about 5 minutes on medium-low, flipping the chicken halfway through, until it’s cooked through and the onions are soft.
- Add the Eggs in Stages: Once the chicken is cooked, increase the heat slightly and, while the sauce is simmering, slowly drizzle in two-thirds of the egg mixture in a circular motion over the pan — avoiding the very edges. Let the eggs set slightly (about 30 seconds to 1 minute), then pour in the rest. Scatter the chopped mitsuba or scallions over the top. Continue to cook just until the eggs are softly set but still runny in places — the hallmark of perfect oyakodon.
- Assemble the Bowl: Scoop hot rice into two serving bowls. Gently slide the chicken and egg mixture over the rice, allowing some of the sauce to soak in. Sprinkle with shichimi togarashi or sansho pepper if desired.
Notes
- Serve immediately while warm and fluffy. If you’re storing leftovers, keep them in an airtight container and refrigerate for up to 2–3 days. Reheat gently to avoid overcooking the eggs.
Nutrition Information:
Yield: 2 Serving Size: 1Amount Per Serving: Calories: 1644Total Fat: 93gSaturated Fat: 30gTrans Fat: 0gUnsaturated Fat: 55gCholesterol: 3336mgSodium: 2430mgCarbohydrates: 44gFiber: 1gSugar: 15gProtein: 146g
Asianplated.com, occasionally offers nutritional information for recipes contained on this site. This information is provided as a courtesy and is an estimate only. This information comes from online calculators. Although allchickenrecipes.com attempts to provide accurate nutritional information, these figures are only estimates.
Frequently Asked Questions
Can I use chicken breast?
You can, but watch the cooking time closely. Breast dries out faster than thigh. I recommend thigh for better texture.
Do I have to use sake?
It’s optional. It helps with the chicken’s smell, but you can skip it if you prefer.
Can I make it ahead?
It’s best fresh since the egg texture changes when reheated, but you can prep the sauce and sliced ingredients ahead to save time.
This is one of those recipes I come back to again and again. It’s easy, comforting, and feels like home every time I make it. If you’re looking for a reliable weeknight meal that doesn’t compromise on flavor, give this one a try.
Try other Japanese recipes: