I still remember the first time I pulled a loaf of shokupan out of my oven. The smell alone — warm, milky, slightly sweet — had me hooked before I even cut into it. This Japanese milk bread is the softest, fluffiest loaf I’ve ever made, and it’s one of those recipes that instantly becomes part of your regular rotation once you get it right.

Whether you’re making toast, sandwiches, or just sneaking slices straight from the cooling rack (been there), this one delivers every time.
Why This Recipe Works So Well at Home
Making bread from scratch might seem like a weekend project, but this one fits easily into a day — and it’s worth every step. I love this recipe because:
- Beginner-friendly process: I break everything down into steps, and once you get the hang of it, it’s easier than you’d think.
- No weird ingredients: You probably have most of this stuff at home — sugar, flour, butter, yeast, etc.
- Stand mixer-friendly: Let the machine do the hard kneading while you daydream about toast.
- Insanely soft texture: This bread is pillowy, like cotton — not exaggerating. Perfect for sandwiches or just slathered with butter.
Ingredients You’ll Need (and Some Swaps I’ve Tried)
Here’s what goes into a loaf of shokupan. I’ve included notes from my kitchen too.
- Warm water – I aim for just above lukewarm, like bathwater warm. Not too hot or you’ll kill the yeast.
- Sugar + honey – The honey adds depth; sugar brings that slight sweetness.
- Salt – I use kosher salt.
- Instant yeast – No need to proof it separately unless you’re using active dry yeast.
- Bread flour – Go for high-protein flour (I use King Arthur). All-purpose just doesn’t rise the same.
- Skim milk powder – If you can’t find skim, nonfat dry milk works. Coconut milk powder is a solid plant-based option.
- Unsalted butter – Softened, not melted. I usually cube it before adding it into the dough.
If you’re vegan, swap the butter for plant-based butter and the milk powder for coconut milk powder. I’ve tried both — they work just fine.
Tools That Make Life Easier
You don’t need a bakery setup, but here’s what helps:
- Stand mixer with dough hook
- Digital kitchen scale (worth it — especially for bread)
- Loaf pan with a lid (for that classic flat-top look)
- Rolling pin, tea towel, wire rack
If you’re making this more than once (which you will), the lidded loaf pan is a nice investment.

Step-by-Step: Making Your Own Shokupan
1. Mix the Ingredients
Start by whisking the water, sugar, salt, and honey together in a bowl. If you’re using instant yeast, just mix it in. If it’s active dry, let it bloom first in the warm water for 5–10 minutes.
Then in the stand mixer bowl, mix your flour and milk powder. Pour in the liquid, and mix it all with a spatula until it forms a scraggly dough.
2. Knead the Dough
Let your mixer handle this part. I start on speed 2, just until it comes together, then bump it up to 4 for a few minutes. Add your butter cubes slowly, then knead until it’s smooth and shiny. I check it with the windowpane test — stretch a small bit of dough until you can almost see through it.
That’s how you know it’s ready.
3. Slam, Fold, and Let It Rise
I know this part sounds aggressive, but it’s actually fun. I slam the dough onto the counter (smooth side down), then fold it over itself. I do this a few times to build structure.
Then I pop it in a greased bowl, cover it, and let it rise somewhere warm until it triples in size. Usually takes about 40 minutes in my kitchen.
4. Divide and Rest the Dough
Once risen, gently deflate it and divide into three equal parts. I weigh them for accuracy (yes, this is one of those recipes where it’s worth it). Cover the dough balls with a damp towel and let them rest for 15 minutes. This lets the gluten relax and makes shaping easier.
5. Shape and Pan the Dough
Roll each ball into a rectangle. Fold it into thirds like a letter, then roll it up and pinch the seams closed.
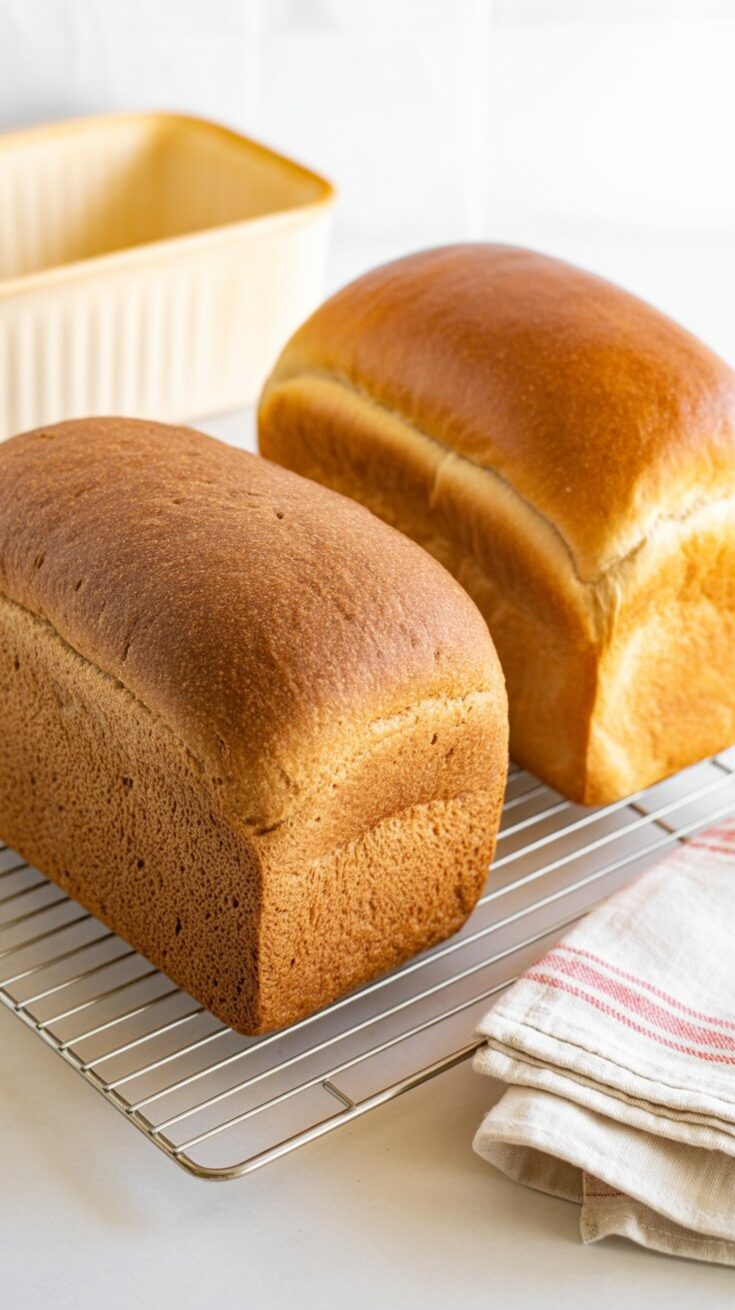
Grease your loaf pan with butter, then line up the dough rolls inside. Cover with plastic wrap and let it rise again — this time until the dough is about ¾ to ⅞ of the way up the pan, depending on whether you want a flat or domed top.
6. Bake the Bread
Start with a hot oven (425ºF), then lower it once the bread goes in. I do 415ºF for flat-topped, 385ºF for round-topped.
Bake until golden brown and your kitchen smells like a bakery. I usually tap the top — it should sound hollow.
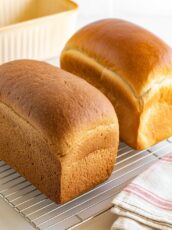
7. Cool It Completely
This part’s hard — waiting. But don’t slice while it’s warm. Let the loaf rest on a wire rack for at least 2–3 hours. I usually go do something else, so I’m not tempted.
Once cool, slice with a serrated bread knife and marvel at the texture.
How I Use Shokupan All Week
Honestly, I could eat this bread in some form every day. Here are my go-to ways:
- Thick-cut toast with butter – My favorite weekend breakfast
- Egg salad sandwiches – So soft it almost melts around the filling
- Japanese Pizza Toast – Quick lunch with tomato sauce and cheese
- Katsu sando – Crispy cutlet, shredded cabbage, tonkatsu sauce. So satisfying.
- Jam and whipped cream fruit sando – Dessert dressed like a sandwich
Even the crusts don’t go to waste — I toast them with sugar and butter for a little sweet snack.

Handy Storage Tips
- Room temperature: I keep mine in a zip-top bag, sliced as needed. Lasts about 1–2 days like this.
- Freezer: Slice before freezing. Wrap each slice and store for up to 2 weeks. I mist the frozen slices with a little water and toast straight from the freezer.
Don’t refrigerate it — it’ll dry out.
Troubleshooting and FAQ
Why isn’t my dough rising?
Check the yeast — if it’s old, it might be inactive. Make sure your water isn’t too hot.
My bread came out dense. What happened?
Could be under-kneaded, or your proofing area might have been too cold. A good windowpane test helps catch this early.
Can I use all-purpose flour?
I’ve tried. It works, but you’ll miss out on that super fluffy height. Bread flour gives the best result.
Do I need a special pan?
Not necessarily, but if you want the iconic flat top, the lidded loaf pan helps. A regular loaf pan with foil on top works in a pinch.
Japanese Milk Bread (Shokupan)
There’s soft bread, and then there’s Shokupan — the Japanese loaf that’s unbelievably fluffy, slightly sweet, and perfect for toasting or sandwiches.
Ingredients
- 350g bread flour
- 20g skim milk powder (or non-dairy milk powder)
- 7g instant yeast
- 250g warm water (not hot)
- 20g granulated sugar
- 10g honey
- 7g kosher salt
- 25g unsalted butter, room temperature (or vegan alternative)
- Neutral oil, for greasing
- Extra butter or spray oil for greasing the pan
Instructions
- Start the Dough : Mix warm water, sugar, salt, and honey in a large bowl. Stir in the yeast and let it sit for about 10 minutes, until the surface becomes bubbly and foamy.
- Meanwhile, combine bread flour and milk powder in the bowl of a stand mixer. Make a well in the center and pour in the yeast mixture. Mix everything together into a shaggy dough.
- Kneading : Attach the dough hook to your stand mixer. Start kneading on low speed (Speed 2) for about 2 minutes, then increase to medium (Speed 4) and knead for 4 more minutes. The dough should start coming together but will still feel a little rough.
- Add softened butter and knead again on low speed until it disappears into the dough. Finish by kneading on medium-high (Speed 6) for 3 minutes until the dough is smooth, elastic, and glossy. It should cleanly pull away from the sides of the bowl.
- Check the Dough : To make sure the dough is ready, do a quick windowpane test — stretch a small piece gently; it should form a thin sheet without tearing. The dough temperature should be between 79–82ºF for ideal rising.
- First Rise : Lightly grease a bowl with oil. Shape the dough into a ball, smooth side up, and place it in the bowl. Cover and let it rise in a warm spot for 40 minutes to 1 hour, or until tripled in size.
- Divide and Rest : Punch down the dough gently and transfer it to a floured surface. Divide into 3 equal portions (2 if using a square pan) and shape each into a ball with a taut, smooth surface. Cover with a damp cloth and let them rest for 15 minutes.
- Roll and Shape : Roll each dough ball into a rectangle about 8 x 10 inches. Fold the rectangle in thirds like a letter, tuck the edges, then roll it up tightly from the short end into a log. Pinch the seam closed.
- Pan and Final Proof : Grease your loaf pan and arrange the rolled pieces, seam-side down, side by side. Cover loosely and let the dough rise again until it fills about 85–90% of the pan’s height (for round top) or 75–80% if using a lid for a flat top.
- Bake : Preheat your oven to 425ºF (220ºC). For a round-top loaf, lower the temp to 385ºF (195ºC) before baking and bake for 30 minutes. For flat-top loaves, close the lid and bake at 415ºF (210ºC) for 25–30 minutes. If baking both styles together, 400ºF (200ºC) usually works well.
- Cool : Once out of the oven, firmly tap the pan against the counter to release steam and prevent collapsing. Remove the bread and cool completely on a wire rack before slicing.
Notes
- If you plan to eat it within 2 days, wrap the cooled loaf in a bag and slice as needed. For longer storage, slice and freeze — it toasts beautifully straight from the freezer.
Nutrition Information:
Yield: 1 Serving Size: 1Amount Per Serving: Calories: 1929Total Fat: 66gSaturated Fat: 23gTrans Fat: 1gUnsaturated Fat: 38gCholesterol: 85mgSodium: 2837mgCarbohydrates: 286gFiber: 10gSugar: 30gProtein: 46g
Asianplated.com, occasionally offers nutritional information for recipes contained on this site. This information is provided as a courtesy and is an estimate only. This information comes from online calculators. Although allchickenrecipes.com attempts to provide accurate nutritional information, these figures are only estimates.
A Few Fun Variations
If you’ve got the base recipe down, try switching it up:
- Black sesame shokupan – Add toasted sesame seeds into the dough.
- Raisin bread – Fold in some golden raisins at the end of kneading.
- Animal-shaped loaves – Great for kids’ snacks or themed lunches.
- Vegan version – Works great with vegan butter and coconut milk powder.
Making Japanese Milk Bread at home is one of those small joys that pays off big. It’s soft, comforting, and just so satisfying — whether it’s toast in the morning or sandwich bread at lunch. Once you make it, I’m pretty sure it’ll become a regular in your kitchen like it is in mine.
Try other Japanese recipes: