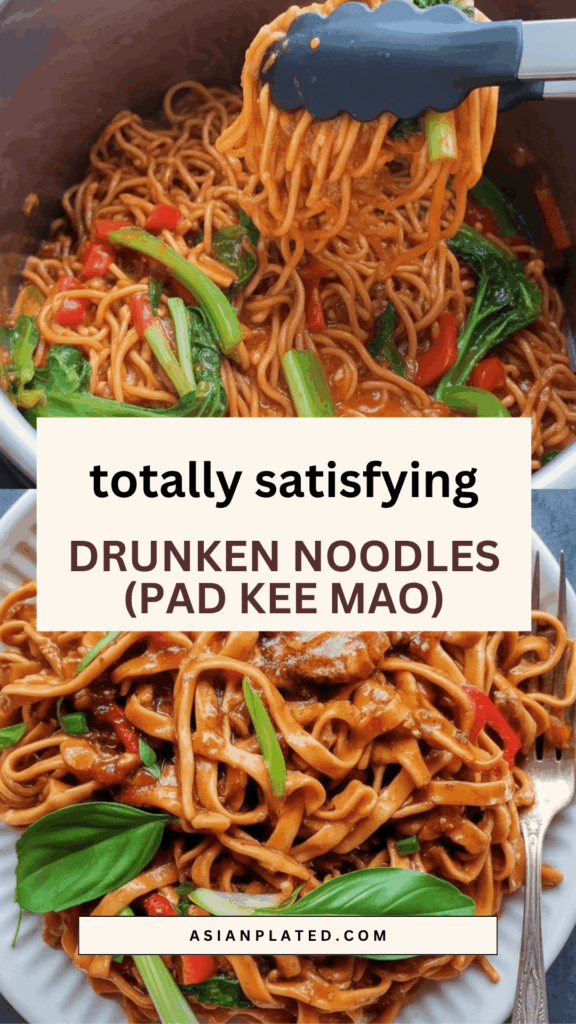
If you’re craving a bold, saucy, and totally satisfying Thai dish, Drunken Noodles might just be your new weeknight favorite. I’ve adapted this version to cook in the Instant Pot, and let me tell you—it’s ridiculously good. Think tender strips of chicken, slippery wide rice noodles, colorful veggies, and a punchy sauce that brings all the heat and flavor. The best part? It’s ready in 15 minutes and tastes even better than your go-to takeout.
")
Why You’ll Love These Drunken Noodles
This version of Pad Kee Mao hits all the right notes—sweet, savory, spicy, and herby—without needing a wok or complicated prep. It’s designed for busy weeknights, but the flavors make it feel like something special. I’ve dialed down the spice a bit to make it more family-friendly, but feel free to crank it up if that’s your thing.
Ingredients You’ll Need
(Full measurements are listed in the recipe card at the bottom)
For the Chicken and Noodles:
- Boneless, skinless chicken breasts or thighs, cut into strips
- Wide rice noodles or Pad Thai noodles (gluten-free by nature)
- Yellow onion (or red, if that’s what you’ve got)
- Garlic, minced
- Red bell pepper – or mix in orange/yellow for more color
For the Sauce:
- Light soy sauce
- Dark soy sauce
- Oyster sauce
- Fish sauce
- Mirin (or substitute if unavailable)
- Brown sugar
- Red pepper flakes (or Thai chilies if you want it hotter)
Finishing Touches:
- Fresh basil (Thai basil if you can find it, regular basil works too)
- Green onions (just the green tops)
- Any neutral oil like avocado, sunflower, or light olive oil

Helpful Tips Before You Start
- Pressure cook the noodles first – That’s the secret to getting wok-like flavor in the Instant Pot. Toss the sauces later for the best taste.
- Zig-zag noodle placement – Layer the noodles in a loose nest to ensure even cooking.
- Want soft veggies? Add them during pressure cooking.
- Prefer a crunch? Stir them in after cooking and let them steam in residual heat.
- Don’t skip detangling – Rice noodles clump up. Use two forks, not tongs, to gently separate them.
- Make it spicy or mild – Red pepper flakes give good flavor without burning your tongue. Add Thai chilies if you like the heat.
- No Thai basil? Regular basil does a great job too.
How to Make Drunken Noodles in the Instant Pot
Step 1: Sauté the Chicken
Start by sautéing your chicken pieces in a bit of oil on the LOW sauté setting. Add a dash of light soy sauce while it browns—this helps the chicken soak up flavor and stay juicy. Once lightly golden, remove and set aside.
Step 2: Pressure Cook the Noodles
Sauté the onions and garlic in the same pot until fragrant. Add a bit of water and deglaze thoroughly—scraping up any browned bits to avoid the burn warning.
Now lay the dry rice noodles in a zig-zag pattern (like a bird’s nest). Gently press them down so they’re coated in the liquid.
Layer your sliced peppers or other veggies on top if you like them soft. Pressure cook on HIGH for 2 minutes, then let it naturally release for 3 minutes. Quick release any remaining pressure.
Step 3: Detangle the Noodles
Once you open the lid, grab two forks and start separating the noodles gently. This part takes a little patience, especially with gluten-free noodles—but it’s worth it. Avoid using tongs or spatulas right away to prevent breakage.
Step 4: Toss Everything in Sauce
Turn the sauté function back on LOW. Pour in all the sauce ingredients along with red pepper flakes (optional). Gently toss the noodles until everything’s coated and glossy.
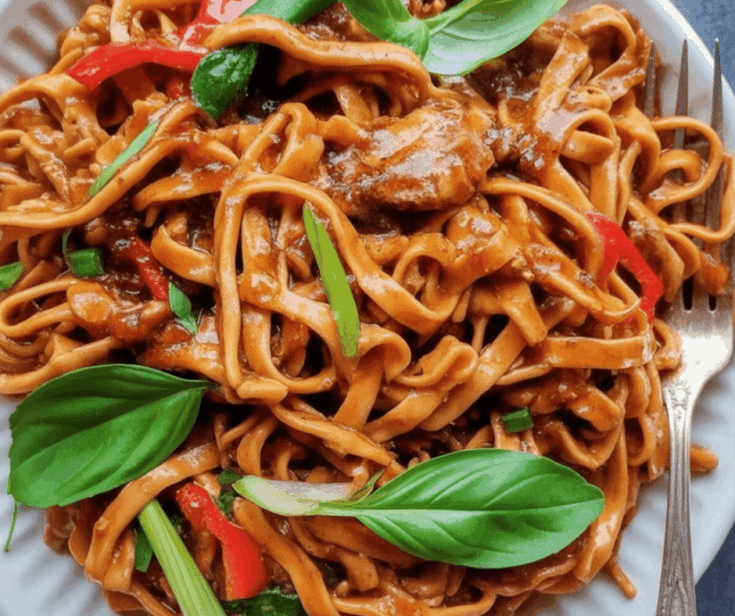
Add the sautéed chicken back into the pot, throw in the basil and green onions, and give it a final stir. Serve it up hot while the flavors are bold and fresh.
Serving Suggestions
Drunken Noodles are amazing on their own, but if you want to make it a full spread, try serving with:
- Thai cucumber salad
- Stir-fried green beans or bok choy
- Crispy roasted Brussels sprouts
- A light Asian slaw or leafy salad
How to Store Leftovers
Fridge: Store in an airtight container for up to 5 days.
Freezer: Freeze in individual portions for up to a month. Skip the basil and scallions before freezing—add those fresh when reheating.
Reheating Instructions
- From the fridge: Add a splash of water and reheat in the microwave or in a nonstick pan on the stove. Fresh basil or scallions stirred in at the end brings the flavor back to life.
- From frozen: Thaw overnight in the fridge or on the counter, then follow the reheating method above.
Drunken Noodles (Pad Kee Mao)
Quick, flavorful, and packed with basil and tender chicken, these Instant Pot Drunken Noodles are a speedy gluten-free noodle dish that's sure to beat any takeout craving.
Ingredients
For the Noodles and Chicken:
- 1 lb boneless, skinless chicken thighs or breasts, sliced into 2-inch strips (453g)
- 8 oz wide rice linguine noodles (I used A Taste of Thai brand – see post for image, 227g)
- ½ red bell pepper, thinly sliced
- 1 tbsp finely minced garlic
- ½ medium yellow onion, thinly sliced (don’t use red onion)
- ½ tsp crushed red pepper flakes (skip if sensitive to spice – see notes)
- 5 tbsp avocado oil, divided equally
Sauce Ingredients:
- 2.5 tbsp light soy sauce
- 2 tbsp dark soy sauce
- 1 tbsp oyster sauce
- 1 tbsp fish sauce
- ½ tbsp mirin (alternatives listed in notes)
- 1.5 tbsp brown sugar
To Marinate Chicken Quickly:
- 1 tbsp dark soy sauce
- ¼ tsp red pepper flakes (optional)
Liquid for Cooking:
- 2 cups water or chicken broth
Garnish:
- 1 cup loosely packed basil leaves (preferably Thai basil)
- 5 scallions, green parts only, chopped into 2-inch pieces
Instructions
- Toss the chicken strips in dark soy sauce and red pepper flakes. Set aside while prepping other ingredients.
- Turn your Instant Pot to SAUTE (Normal). Add 2.5 tbsp oil. Once hot, add the marinated chicken and cook until the edges turn golden. The chicken should be cooked through. Remove and set aside.In the same pot, add the remaining 2.5 tbsp oil. Stir in garlic and onion. Sauté for 1 minute, then cancel the sauté mode.
- Pour in the water or broth and thoroughly scrape the bottom and sides of the pot to prevent a BURN error.
- Place the dry rice noodles in the pot in a criss-cross or "bird’s nest" shape (refer to video for clarity). Gently press down with a spatula so they’re covered in liquid—this step is crucial. Layer the bell pepper slices on top of the noodles.Close the lid, seal the valve, and pressure cook on HIGH for 2 minutes for firm noodles. (See notes below for softer options.) When done, let it naturally release pressure for 3 minutes, then manually release the rest. Open the lid carefully. A bit of liquid may remain, but the noodles will absorb it as you separate them.
- Using two forks, gently separate the noodle strands. Gluten-free rice noodles take a little extra time and care to loosen compared to wheat noodles.
- Set the Instant Pot to SAUTE (Low). Pour in all sauce ingredients and add chili flakes (if using). Toss the noodles until they’re evenly coated. Return the cooked chicken to the pot and combine with the noodles. Cancel sauté mode. Add in basil leaves and scallions, mix well, and serve immediately.
Notes
- Measurements: 1 cup = 240 ml, 1 tsp = 5 ml
- Spice Level: This version is mildly spicy; adjust to your liking.
- Make it Hotter: For extra kick, add red Thai chilies or bird's eye chilies.
- Basil Tip: Thai basil gives it a slightly licorice note. Regular basil works well too.
- Noodle Type: Use wide rice noodles. I used "A Taste of Thai" brand rice linguine.
- Al dente noodles: 2 min pressure cook, 3 min NPR
- Softer noodles: 4 min pressure cook, Quick Release
- Softer veggies = cooked under pressure (as in this recipe)
- Crisper veggies = stir in with sauces post-pressure cooking and let sit covered 5–10 mins
- Sweet Option: Add 2.5 tbsp brown sugar for sweeter noodles
- Mirin Substitute: Use rice vinegar; the sugar already in the recipe helps balance flavors
- Other Veggie Options: Bell peppers (any color), julienned carrots, sliced baby corn
- Avoid: broccoli, mushrooms, cabbage, snow peas—better suited for Lo Mein
Nutrition Information:
Yield: 3 Serving Size: 1Amount Per Serving: Calories: 769Total Fat: 37gSaturated Fat: 7gTrans Fat: 0gUnsaturated Fat: 28gCholesterol: 186mgSodium: 3012mgCarbohydrates: 63gFiber: 4gSugar: 10gProtein: 48g
Asianplated.com, occasionally offers nutritional information for recipes contained on this site. This information is provided as a courtesy and is an estimate only. This information comes from online calculators. Although allchickenrecipes.com attempts to provide accurate nutritional information, these figures are only estimates.
Frequently Asked Questions
What kind of noodles are best for drunken noodles?
Go for wide rice noodles or extra-wide if you can find them. Pad Thai-style noodles work well too.
Are drunken noodles the same as lo mein?
Nope! Lo mein is made with wheat-based egg noodles and is milder. Drunken noodles are spicier, made with rice noodles, and usually include basil.
What does the sauce taste like?
Savory, spicy, and a little sweet. The soy sauces add depth, the mirin and oyster sauce bring sweetness, and garlic and chili flakes pack a punch.
Why are they called drunken noodles if there’s no alcohol?
Despite the name, there’s no booze in this dish. The term “drunken” might refer to how spicy it is—spicy enough to leave you a little dazed!
Try other recipes:
